
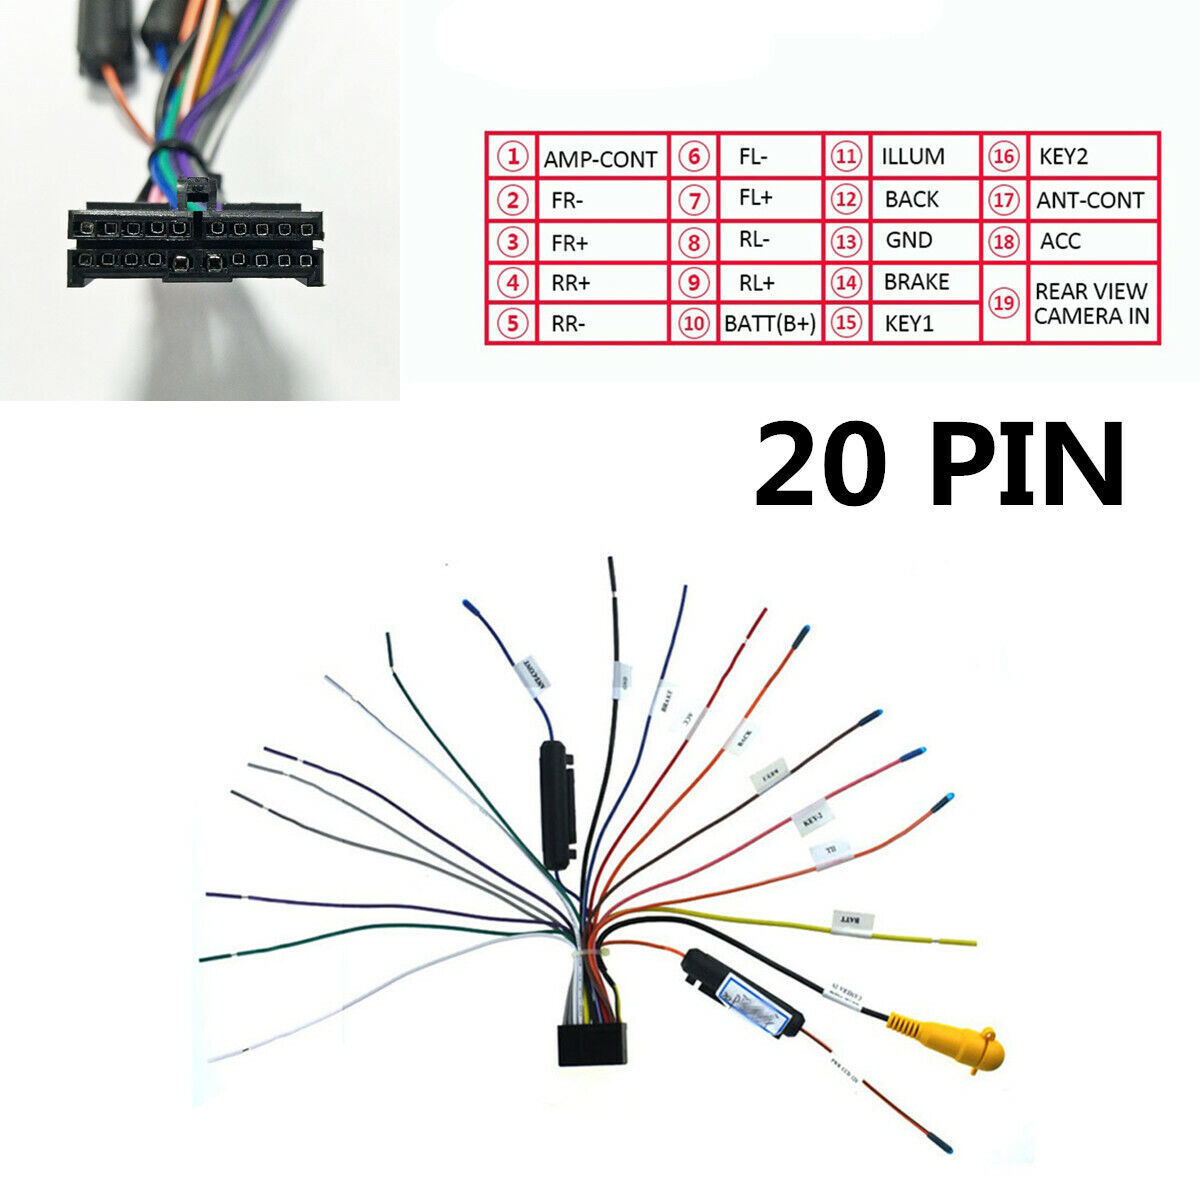
An auto stereo wiring harness connects a car stereo to a vehicle’s electrical system quickly and safely.
I have installed and troubleshot dozens of car audio systems. This guide on auto stereo wiring harness covers definitions, wire color codes, types, step-by-step install tips, troubleshooting, buying advice, and real-life lessons. Read on to gain clear, practical knowledge and avoid common mistakes when working with an auto stereo wiring harness.

What is an auto stereo wiring harness?
An auto stereo wiring harness is a bundled set of wires and connectors. It links a head unit to battery power, ground, speakers, antenna, and accessories.
A harness simplifies installation by matching the stereo wires to the car’s factory plugs. It avoids cutting factory wires and preserves vehicle features. Using the right auto stereo wiring harness saves time and reduces errors.
Key components and wire color codes
An auto stereo wiring harness contains the main wires you need. Here are the common parts and typical colors you will see.
- Constant 12V (battery) — yellow. Supplies memory power to the stereo.
- Switched 12V (ignition) — red. Powers the unit when the car is on.
- Ground — black. Required for a stable electrical reference.
- Accessory/remote turn-on — blue or blue/white. Activates amps or powered antennas.
- Illumination/dimmer — orange or orange/white. Ties into dash lights.
- Left front speaker (+/-) — white / white with black stripe.
- Right front speaker (+/-) — gray / gray with black stripe.
- Left rear speaker (+/-) — green / green with black stripe.
- Right rear speaker (+/-) — purple / purple with black stripe.
Note that some vehicles use different colors. Always verify against the car’s wiring diagram before connecting. Many harnesses include labeled connectors for easy matching.
Types of auto stereo wiring harnesses
Choosing the right harness matters. Different types match different needs.
- OEM harness — made for a particular vehicle model and year. Full plug-and-play fit.
- Aftermarket vehicle-specific harness — lets modern stereos fit older cars. Maintains factory connectors.
- Universal harness — generic wires and bare leads for custom installs. Flexible but requires splicing.
- Adapter harness — links an aftermarket radio to factory plugs without cutting wires.
- Steering wheel control harness — retains button functions when upgrading a head unit.
- Amplifier integration harness — transfers speaker-level signals to factory amps safely.
Pick a harness that fits the vehicle and your goals. A vehicle-specific harness is easiest for most installs.
Why use an auto stereo wiring harness?
A harness gives clear advantages over direct splicing.
- Plug-and-play convenience — saves time and effort.
- Preserves factory wiring and resale value.
- Retains steering wheel controls, chimes, and vehicle features.
- Lowers risk of short circuits and poor connections.
- Makes troubleshooting simpler by keeping wiring organized.
If you plan to revert to factory stereo later, a harness makes that swap painless.
How to install an auto stereo wiring harness — step-by-step
This step list covers a typical install. Read all steps before you start.
- Gather tools and materials.
- Wire stripper, crimp tool, heat shrink, multimeter, soldering iron (optional), electrical tape.
- Disconnect the battery negative terminal.
- Prevents shorts and protects electronics.
- Remove the factory stereo and trim panels.
- Keep screws and clips organized in labeled containers.
- Identify the vehicle wiring and the harness connector.
- Match wire labels on the harness to the head unit and car wires.
- Connect power and ground first.
- Confirm constant 12V and switched 12V with a multimeter.
- Match speaker wires by color and polarity.
- Connect positive to positive and negative to negative.
- Attach accessory, amp turn-on, and illumination wires.
- Use the blue lead for amp remote and/or powered antenna.
- Protect connections.
- Use crimp connectors with heat shrink or solder and heat shrink for best results.
- Reconnect battery and test all functions.
- Test power, speakers, remote control features, and steering wheel controls if present.
- Secure the harness and reassemble the dash.
- Avoid pinching wires and keep harness away from moving parts.
Tip: Label each connection with a small piece of tape. It speeds debugging and future swaps.
Common wiring diagrams and examples
Below are example mappings you will encounter. These are typical, but always check your harness labels.
- Power and ground
- Yellow — constant 12V (memory)
- Red — switched 12V (ignition)
- Black — ground
- Speaker wiring
- White / White-black — left front +/-
- Gray / Gray-black — right front +/-
- Green / Green-black — left rear +/-
- Purple / Purple-black — right rear +/-
- Accessory and extras
- Blue or Blue/white — remote turn-on (amp/antenna)
- Orange/Orange-white — illumination/dimmer
- Brown — phone mute in some systems
Example note: If the vehicle uses amplified factory speakers, use a line output converter or a harness that supports speaker-level inputs.
Troubleshooting and common problems
Problems are usually simple to fix when you know where to look. Here are frequent issues and quick fixes.
- No power to the stereo
- Check battery connection and fuses. Verify constant 12V and switched 12V with a multimeter.
- Stereo turns off when you start the car
- Likely reversed constant and switched wires. Swap yellow and red connections if needed.
- One or more speakers are silent
- Confirm speaker polarity and speaker-level feed. Check speaker wires for breaks.
- Static or poor sound
- Check ground and reduce loop noise. Ensure good chassis ground near the radio.
- Steering wheel controls not working
- Use the correct interface harness or program the control adapter per instructions.
If a problem persists, step back and recheck each connection. Small mistakes are often the cause.
Buying guide and checklist for an auto stereo wiring harness
Choose a harness that matches the vehicle and stereo. Use this checklist when shopping.
- Vehicle fitment — vehicle-specific is best for plug-and-play.
- Head unit compatibility — check connector type and pinout.
- Retains features — steering controls, factory amps, chimes.
- Quality of connectors — solid pins and snug fit reduce failures.
- Wire gauge — thicker wire handles more current for power and speakers.
- Included instructions — clear diagrams save time.
- Brand reputation and return policy — buy from reputable sellers if unsure.
If in doubt, buy a harness kit that includes adapters for your model. It is usually worth the small extra cost.
Safety tips and best practices
Work safely and protect the vehicle’s electronics.
- Disconnect the battery before starting work.
- Use fused connections for power feeds to protect circuits.
- Avoid over-crimping; use the right tool for consistent crimps.
- Use heat shrink over splices to seal and strengthen joints.
- Route wires away from sharp edges and heat sources.
- Test before final reassembly to avoid removing panels twice.
These habits reduce risk and make installations last.
My experience and tips from real installs
I have wired many head units over the years. A few honest lessons can save you time.
- Always verify wires with a meter. Relying on color alone cost me an afternoon once.
- Solder and heat shrink when possible. Crimping is faster but soldered joints last longer.
- Keep a small kit in your toolbox: spare fuses, heat shrink, and a connector set.
- If a car has a factory amp, research the integration steps first. I once ruined a speaker by feeding speaker-level to a powered factory amp incorrectly.
- When in doubt, pause and trace. Rushing leads to reversed wires and blown fuses.
These tips come from hands-on installs and fixed mistakes. They help preserve both the stereo and the car.
Quick search questions
Do I need an adapter to keep steering wheel controls?
Yes. Use a steering wheel control adapter harness. It preserves button functions with most aftermarket head units.
Can I splice the factory wires instead of using a harness?
You can, but splicing is risky. A harness avoids cutting factory wiring and keeps the car factory-ready.
Is soldering better than crimping for harness connections?
Soldering gives a strong, low-resistance joint. Crimping is faster and acceptable when done with quality tools.
Frequently Asked Questions of auto stereo wiring harness
What does an auto stereo wiring harness do?
An auto stereo wiring harness connects the head unit to power, ground, speakers, and accessories while matching factory connectors. It simplifies installation and avoids cutting factory wires.
Can I use a universal wiring harness for any car?
A universal wiring harness works with many installs but often requires splicing and more skill. Vehicle-specific harnesses are easier and cleaner.
How do I match wire colors if they differ?
Use a multimeter to confirm each wire’s function. Check continuity and voltage rather than relying on color alone.
Will a wiring harness keep factory amplifiers working?
Yes, with the right adapter or line output converter. Some harnesses include speaker-level outputs to integrate with factory amps.
What tools do I need to install a harness properly?
You need wire strippers, crimp tool, heat shrink or soldering iron, multimeter, and basic trim removal tools. Quality tools reduce mistakes.
Are aftermarket harnesses reliable?
High-quality aftermarket harnesses are reliable when matched to the vehicle. Look for good connectors, proper gauge wires, and clear instructions.
Conclusion
An auto stereo wiring harness makes upgrading car audio safer, faster, and cleaner. It preserves factory wiring and features while reducing installation errors. Use vehicle-specific harnesses when possible, verify wires with a meter, and protect connections with proper crimping or solder and heat shrink. If you follow the practical steps here, you will save time and avoid common pitfalls. Try a well-matched harness on your next audio upgrade, and share your results or questions below — I’d love to hear about your install.