
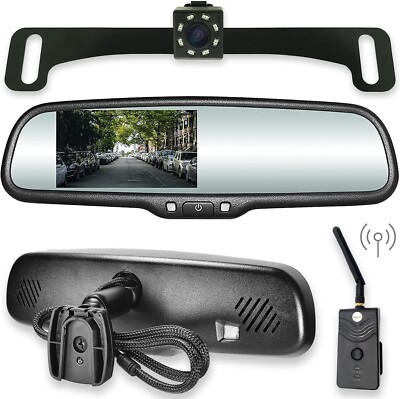
A rear view wireless camera is a smart, cable-free system that shows what’s behind your car.
If you’ve ever craned your neck while backing up or worried about blind spots, a rear view wireless camera can change your daily driving. I’ve installed and tested many of these systems on sedans, trucks, and RVs. In this guide, I’ll break down how a rear view wireless camera works, what to buy, and how to install it right, using clear steps and real-world tips you can trust.

What Is a Rear View Wireless Camera?
A rear view wireless camera is a backup system that sends video from a camera on your vehicle’s rear to a screen in the cabin. It uses wireless signals instead of a long video cable. Most kits include a camera, a transmitter, a display, and power cables.
The goal is simple. Give you a live, wide view when reversing, parking, or hooking up a trailer. A rear view wireless camera can also help on highways when your car is full and rear windows are blocked.
Many modern units add features like night vision, parking lines, split-screen for side cameras, and even recording. A good rear view wireless camera can make parking feel calm and precise.
How Rear View Wireless Cameras Work
The camera mounts near the license plate or above the bumper. It powers on with reverse lights or a constant 12V feed. A transmitter in the camera housing sends a digital signal, often on 2.4 GHz or 5.8 GHz. The in-cabin display receives that signal and shows the live video.
Modern sets use digital encryption to cut static and reduce lag. Expect latency between 100–250 ms on quality models. That is fast enough for smooth parking. Range varies by model. Many rear view wireless camera kits reach 30–50 feet through a car cabin. RV-grade kits can push 60–100 feet with better antennas.
Image quality depends on sensor, lens, and processing. Look for 1080p or higher, true HDR, and a wide field of view that still keeps edges clear.
Benefits You Will Notice
A rear view wireless camera reduces backing stress. It shows low objects, kids, pets, and poles that mirrors often miss. It helps prevent small collisions that cost time and money.
After I put a rear view wireless camera on my pickup, hooking up a trailer became a one-person job. Tight city parking was easier too. You save time every day. You also drive with more confidence in rain and at night.
Other gains include cleaner installs, no need to run a long video cable, and easy moves between vehicles if you change cars. For older cars, a rear view wireless camera adds a modern safety layer with little effort.
Key Features To Look For
When shopping for a rear view wireless camera, check these points:
- Resolution and HDR: Aim for 1080p with real HDR or good WDR for bright sun and shadows.
- Night vision: Look for large sensor pixels, F1.8–F2.0 lens, and low-light performance over IR-only.
- Field of view: 120–150 degrees is a sweet spot. Wider is fine, but avoid fish-eye distortion.
- Latency and stability: Digital link with low lag, strong anti-interference, and auto channel hopping.
- Waterproof rating: IP67 or IP68 to survive rain, mud, and car washes.
- Operating temperature: If you live in very hot or cold areas, check the limits.
- Mount options: License plate frame, bumper, or high-center mount for RVs and vans.
- Power options: Reverse light trigger, constant 12V with manual toggle, OBD power, or solar for plate-frame units.
- Parking lines and calibration: Adjustable guidelines and flip/mirror control for perfect alignment.
- Display: 5–7 inch screen, bright, anti-glare, with optional split-screen and recording.
- Smart extras: Trigger for side cams with turn signals, voice prompts, or DVR loop recording.
- Security: Encrypted digital link and firmware update support.
A well-matched rear view wireless camera should fit your vehicle length, use case, and local weather.
Step-by-Step Installation (DIY-Friendly)
I’ve installed many kits in under an hour on sedans and a bit longer on trucks. Here is a simple plan:
- Plan the mount: Test camera placement. Aim slightly down so you see the bumper edge plus 10–15 feet behind.
- Power the camera: Tap the reverse light for auto-on in reverse. For always-on view, use a fused 12V source and a dash switch.
- Mount the camera: Use the license plate bracket or screw into a flat, solid spot. Seal holes with silicone if needed.
- Route wires neatly: Zip-tie cables away from moving parts and heat. Ground to bare metal.
- Install the display: Mount it near eye level without blocking the road. Use a cigarette lighter plug or hardwire to ACC.
- Pair and test: Shift to reverse. Check video, flip/mirror settings, and adjust parking lines.
- Calibrate: Park straight, measure a safe stop line (for example, 3 feet), and set guidelines to match your bumper edge.
Tips I learned the hard way:
- Test the rear view wireless camera on the bench before drilling anything.
- Use a multimeter to find the true reverse wire. Colors vary by car.
- Avoid routing near high-current wires that add noise.
- On long trucks and RVs, add the booster antenna if the kit includes one.
Solar license plate cameras are even faster. Bolt on, pair with the screen, and you are done. Keep the panel clean for best charge.
Troubleshooting and Care
Common issues with a rear view wireless camera and quick fixes:
- Intermittent signal: Move the display away from metallic tints or phone mounts. Reroute the power ground. Add a booster antenna.
- Lag or freeze: Update firmware if supported. Reduce range by moving the display closer or adjusting antenna angles.
- Grainy night image: Clean the lens. Check voltage. Low power hurts image quality at night.
- Water or fog: Ensure the gasket is seated. Add a thin O-ring. Let it dry with desiccant packs.
- Lines misaligned: Recalibrate guidelines on a level surface. Ensure the camera is centered.
Routine care:
- Wipe the lens monthly. Dust and road film build up fast.
- Check bolts after off-road trips. Vibration can loosen mounts.
- Review wiring yearly, especially grounds, for corrosion.
Wired vs Wireless vs OEM
A rear view wireless camera is fast to install, flexible, and great for most cars, trucks, and RVs. It avoids running a long cable and works well for DIY.
A wired camera offers rock-solid signal and lowest latency. It is the best pick for long buses or if you need multi-cam DVRs all day. But it takes more time to install.
OEM systems integrate with the factory screen and steering controls. They can look the cleanest, but they are pricey to add later and harder to upgrade.
Choose wireless if you want speed, a clean setup, and good range. Choose wired if you tow heavy, drive in RF-heavy yards, or need zero dropouts. Choose OEM when you want a factory look and already have the head unit to match.
Legal, Privacy, and Security
A rear view wireless camera must not block your license plate or brake lights. Mount it clean and centered. Follow local laws on dash screens and recording.
If your unit records, check consent laws for audio and video. Use a secure, encrypted system. Change default passwords. Keep firmware updated to fix bugs and improve stability. This reduces the small risk of interference or snooping.
Real-World Use Cases and Buying Scenarios
Pick based on your daily life:
- City sedan: A slim license plate rear view wireless camera with 1080p and dynamic parking lines. Solar options cut install time.
- Pickup and trailer: A long-range rear view wireless camera with booster antenna and hitch guideline mode.
- RV or camper: High-center mount with a 7-inch bright display and split-screen for side cams.
- Fleet van: Durable, IP68-rated camera with always-on power and DVR recording for incident proof.
- Rideshare: Discreet rear view wireless camera that adds safety in tight pickup zones and garages.
If you park on the street at night, favor HDR and good low-light. If you tow, latency and range matter most. If you hate wires, go solar and keep the panel clean.
Cost and Total Ownership
Budget kits start low and work fine for small cars. Mid-range sets with 1080p HDR and stable links sit in the middle. Pro RV kits with long range and split-screen cost more.
Plan for:
- Screen mount or adhesive pads.
- Add-a-fuse kit for clean power.
- Time to install: 30–90 minutes for most cars, more for RVs.
- Solar unit battery replacements every 2–3 years, depending on climate.
A well-chosen rear view wireless camera often pays for itself by avoiding one minor parking scrape.
Frequently Asked Questions
How do I power a rear view wireless camera?
Most people tap the reverse light so the camera turns on in reverse. For an always-on view, use a fused 12V accessory line with a switch.
Will a rear view wireless camera work with tinted windows?
Yes, but heavy metallic tint can reduce signal strength. Mount the display forward and angle antennas to improve reception.
Can I use a rear view wireless camera while driving forward?
Many kits allow manual activation for constant video. Check your local laws and use the screen without blocking your road view.
How do I reduce interference with my rear view wireless camera?
Keep the display away from Wi‑Fi hotspots and thick metal surfaces. Choose a model with channel hopping and consider a booster antenna.
What field of view is best for a rear view wireless camera?
Aim for 120–150 degrees for parking and backing. Wider views can warp edges, while narrow views may miss obstacles.
Are solar rear view wireless cameras reliable in winter?
They work, but short daylight and snow reduce charge. Wipe the panel clean and consider occasional plug-in charging if your kit allows.
Can I add side cameras to my setup?
Many systems support two to four cameras. You can trigger side views with turn signals or a manual switch.
Conclusion
A rear view wireless camera adds a clear, steady view where you need it most: behind your vehicle. It cuts stress, speeds up parking, and helps you avoid costly bumps. With the right features and a careful install, you get pro-level results in an afternoon.
Pick the setup that fits your drive, mount it well, and calibrate the lines. Then enjoy safer, calmer backing every day. Want more guides like this? Subscribe for updates, ask a question in the comments, or share your install story so others can learn from you.