
Rear camera installation means mount the camera, run power, and connect the display correctly.
If you want a clean, safe, and pro look, you’re in the right place. I’ve done rear camera installation on sedans, SUVs, and work trucks. This guide breaks it all down in plain steps. You will learn what to buy, where to mount, how to wire, and how to fix common issues. Stick with me and your rear camera installation will look factory, work right, and last.

Understanding rear camera systems
Rear cameras help you see what your mirrors miss. They reduce blind spots and can lower the risk of back-over crashes. Many cars now ship with them, but the right upgrade can be sharper, wider, and smarter.
There are two main types. Wired systems use a video cable from the camera to the screen. Wireless systems send video over 2.4 GHz or digital links. Wired is stable and clear. Wireless is fast to install.
Key specs to compare:
- Field of view. Look for about 150–170 degrees for wide coverage.
- Low-light rating. Larger sensors and fast lenses help at night.
- Weather rating. IP67 or better resists water and dust.
- Parking lines. Static lines are fixed. Dynamic lines turn with the wheel when linked to steering data.
From years of rear camera installation work, I find a mid-range wired camera gives the best mix of clarity and value. Add a proper power feed, and it will be rock solid for years.
Tools and materials you need
The right tools save time and pain. Gather these before you start the rear camera installation.
Must-have tools:
- Plastic trim tools to avoid scratching panels.
- A multimeter or test light to find power and ground.
- Fish tape or pull cord to route wires.
- Wire stripper, crimper, and heat gun.
Useful parts and supplies:
- Fuse tap and a 3–5A fuse for a safe power feed.
- Ring terminals, heat-shrink butt connectors, and quality zip ties.
- Electrical tape rated for auto heat, or fabric harness tape.
- Rubber grommets, silicone, or butyl to seal holes.
- 3M VHB tape or stainless screws for mounting.
Tip from the field: buy a few extra RCA couplers and ferrite cores. They fix noise and length issues during rear camera installation.
Pre-installation checklist and safety
Plan the route from hatch or trunk to the dash. Check which side has fewer airbags and less moving trim. Pick the path with gentle bends.
Confirm your display can take a camera feed. Look for a yellow RCA port or a labeled camera input. Some factory radios need an interface module.
Do a dry fit. Power the camera with a bench supply first. See the view and set the angle. Then disconnect the battery negative cable before you begin the rear camera installation.
Step-by-step rear camera installation
A simple plan keeps stress low. Here is the flow I use on most cars.
Wired setup steps
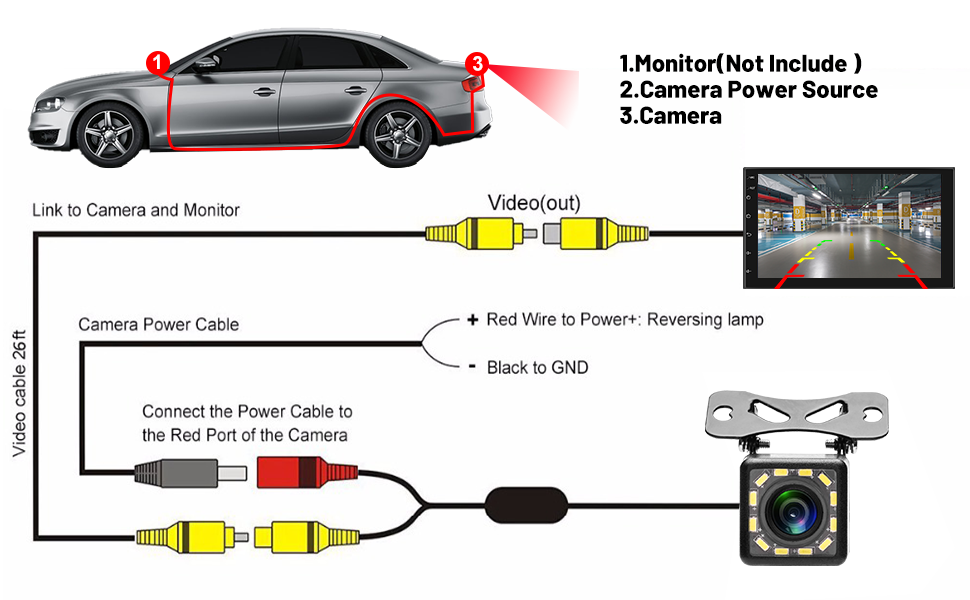
- Mount the camera near the plate, center it, and test the angle.
- Route the cable through the plate light hole or a drilled, grommeted hole.
- Follow the trunk or hatch loom. Leave slack for hinges to move.
- Run the video cable along the side sill to the dash. Avoid airbag paths.
- Ground the camera to bare metal. Sand the paint if needed.
- Choose power. Reverse light for on-when-reversing. ACC or a switch for always-on view.
- Use a fuse tap in an ignition circuit if you want ACC power.
- Connect the trigger wire to reverse power if your screen needs a reverse signal.
- Plug the RCA video lead into the head unit camera input.
- Reconnect the battery and test gear engagement for auto-switching.
- Tidy the harness with zip ties and fabric tape.
- Set parking lines and image flip in the head unit menu.
Wireless setup steps
- Mount the camera as above.
- Power the camera from the reverse light or ACC with an inline fuse.
- Mount the transmitter near the rear and keep its antenna clear of metal.
- Mount the receiver near the head unit for a short video run.
- Pair the units and test for signal and lag.
- Secure the modules and tidy the wiring.
Personal note: My fastest rear camera installation was a wireless kit on a pickup. It took one hour. The longest was a coupe with tight trim and a factory radio module. Take your time with routing. Clean paths prevent future rattles.
Wiring and power options
Power choices shape how the system behaves. For most drivers, reverse light power is best. The camera turns on only in reverse, and the screen switches fast.
If you want a manual view while driving, use an ACC power feed and a dash switch. Add a relay to feed stable power and avoid video drop when cranking. Always fuse near the source.
Ground needs bare metal. Scrape paint. Use a ring terminal under a factory bolt. A bad ground causes lines, flicker, or a blue screen.
Video noise fixes:
- Keep video cable away from power lines and amps.
- Add ferrite cores near the camera and the head unit.
- Use shielded RCA cables for long runs.
For the cleanest rear camera installation, avoid tapping thin body control module wires. Use a fuse tap in a known ACC or reverse circuit and test with a meter.
Mounting locations and calibration
Mount height and angle shape what you see. A spot 18–36 inches from the ground gives a natural view. Center the lens above the plate and tilt it down 10–20 degrees so you can see the bumper edge.
License plate cameras are fast to fit. Lip-mount cameras look cleaner and hide better. Both work well if aimed right.
Calibrate your parking lines. Park on a level area. Mark a straight line with chalk behind the car. Adjust the head unit grid so the line lines up with the marks at 1, 3, and 6 feet. Save the setting. This small step pays off every day.
Integration with head units and displays
Aftermarket head units have a labeled camera input and a reverse trigger wire. Connect the RCA to the input and feed the trigger from the reverse power. Turn on the camera setting in the menu.
Factory radios may need an interface. These modules unlock the video input and tell the car it has a camera. They keep steering wheel controls and parking sensors working.
Other display choices:
- Clip-on mirror monitors that power up in reverse.
- Standalone screens for work trucks or trailers.
- Wireless kits that pair to a dash display.
Note: Some systems show video only when in reverse due to safety rules. That is normal. The rear camera installation still helps in tight spots and parking.
Troubleshooting and testing
If the screen is blue or black, check power and ground first. Use a meter. Then test the RCA by wiggling the plug and trying a short spare cable.
If the image is mirrored wrong, flip the small in-line toggle or change the menu setting. If lines are on when you do not want them, cut or connect the tiny loop wire that controls overlays.
Flicker on shifts often means weak power. Add a relay and a clean fuse tap. Grainy night video can be a dirty lens. Wipe it with glass cleaner and a soft cloth.
From my rear camera installation notes: nine out of ten problems are power or ground. Verify voltage with the lights on. That simple check saves hours.
Legal, warranty, and data privacy notes
Check local rules on plate frames and lights. Do not block the plate or any lamp. Secure the camera so it does not fall off on the road.
If your car is leased or under warranty, avoid hard splices on key harnesses. Use adapters or modules made for your model. Keep your receipts and a wiring diagram.
Wireless kits can pick up or leak signals. Use models with encrypted links if privacy is a concern. Always mount modules inside the cabin when possible.
Cost, time, and value: Is DIY worth it?
A solid wired kit runs 40–120 dollars. A quality wireless kit runs 80–200 dollars. Add 15–30 dollars for wiring supplies and tools if you do not have them.
DIY time is two to four hours for most cars. Trucks and hatchbacks are faster. Coupes and luxury trims take longer.
Pro rear camera installation runs 100–300 dollars for labor. DIY saves money and teaches you your car. For many drivers, one safe back-in pays for the effort.
Maintenance and best practices
Clean the lens often, more in winter. Salt and dust cut night view fast. A quick wipe makes a big change.
Check cable slack near hinges each oil change. Tight wires break inside the jacket. Re-seat loose RCA plugs and refresh tape as needed.
Update wireless firmware if the maker offers it. Review your parking line setup when you change tires or ride height. Small changes shift the view.
These small habits keep your rear camera installation sharp, safe, and ready for years.
Frequently Asked Questions of rear camera installation
Do I need to disconnect the battery before rear camera installation?
Yes, disconnect the negative terminal. It protects you and the car’s electronics while you wire and route cables.
Can I power the camera from the reverse light only?
Yes, and it is the most common plan. The camera turns on only in reverse, and the screen auto-switches.
Why is my image flipped or parking lines look wrong?
Most cameras have a flip wire or a menu option. Toggle the mirror setting and adjust grid lines in the head unit.
Will a wireless kit lag or drop the signal?
Good digital kits work well at short range. Metal panels and big trucks can block the signal, so place modules smartly.
Can I add a rear camera to a factory radio with no input?
Often yes with an interface module. It adds a camera input and keeps factory features working.
How high should I mount the camera?
Aim for 18–36 inches from the ground and centered. Tilt down so you can see the bumper edge and the area behind you.
What if I get static or flicker after I finish rear camera installation?
Clean up power with a relay and a solid ground. Add ferrite cores to the video line and keep it away from power cables.
Conclusion
Rear camera installation is simple when you plan the route, power it right, and take time to aim. Pick a quality camera, use clean power and ground, and set the lines to match your car. Test as you go and fix small issues fast.
You now have the steps, tips, and checks that pros use every day. Grab your tools, follow the plan, and make your drive safer today. If this helped, share it, subscribe for more DIY guides, or drop your questions in the comments.