
Mount the camera, route the cable, power it safely, then configure settings.
If you want clear, reliable video from day one, you need a clean install. In this guide, I’ll show you how to install dash cam gear like a pro—front and rear—without rattles, cable mess, or blown fuses. I’ve done dozens for rideshare drivers, family, and my own cars, and I’ll share mistakes to avoid, smart routing tricks, and safe hardwiring steps. By the end, you’ll know how to install dash cam systems that look factory and work every time.

What You’ll Need
Before you learn how to install dash cam gear, gather the right tools. This keeps the job fast and smooth.
Essentials:
- Dash cam kit with power cable and mounting pad
- High-endurance microSD card (Class 10 or V30, 64–256 GB)
- Plastic trim tool set
- Cable clips or adhesive guides
- Microfiber cloth and isopropyl alcohol
- Measuring tape or ruler
Nice to have:
- Add-a-circuit fuse tap kit (mini, low-profile mini, or micro2, depending on car)
- Multimeter or test light
- 12V socket adapter or OBD power adapter
- Hardwire kit with low-voltage cutoff for parking mode
- Small zip ties
- Spare fuses that match your car
- Gloves and safety glasses
- Owner’s manual for fuse map and airbag locations
Choose the Right Dash Cam for Your Car
Knowing how to install dash cam hardware starts with picking a unit that fits your needs. Think about video quality, features, and how you plan to power it.
Key features:
- Resolution and sensor quality. Aim for 1440p or 4K in front. Night vision helps a lot.
- Field of view. 130–150 degrees is a sweet spot. Wider can warp edges.
- GPS and Wi‑Fi. GPS tags speed and location. Wi‑Fi helps with updates and clips.
- Capacitor vs. battery. Capacitors handle heat better and last longer.
- Parking mode. Needs a hardwire kit or OBD power and a battery cutoff.
- CPL filter. This reduces glare from the dashboard.
Real-world tip: If your windshield is steep, pick a compact wedge-shaped camera. It hides better and stays put.
Plan Your Install and Safety Prep
A little planning is half of how to install dash cam success. Look at your car’s layout before you stick anything down.
Plan points:
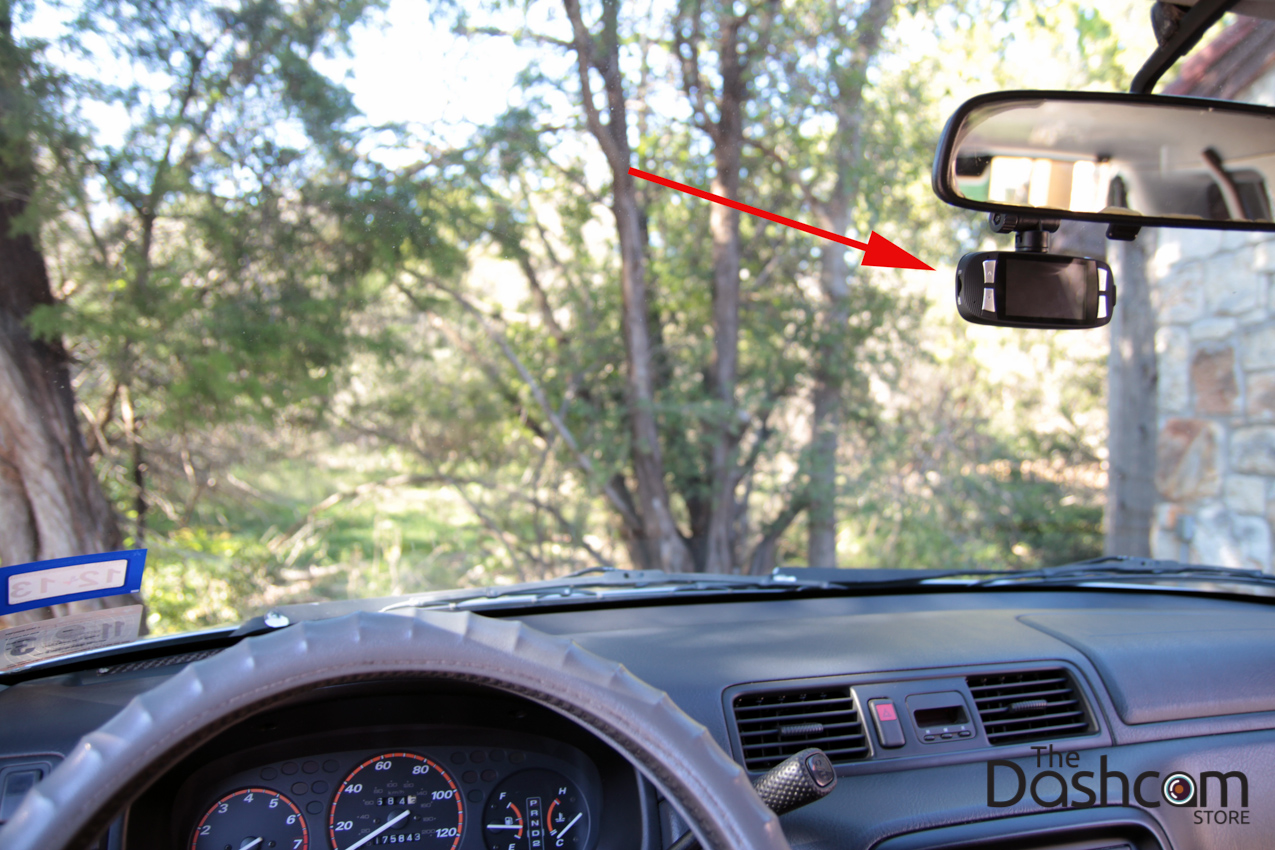
- Mount zone. Place the cam behind the rearview mirror, high and centered, outside the driver’s view.
- Airbag paths. Avoid the A‑pillar airbag area. Tuck cables along the headliner and door weather strip instead.
- Power path. Choose either the 12V socket, OBD port, or a fuse tap hardwire. Each has pros and cons.
- Cable length. Dry-fit the cable path to be sure it reaches without strain.
Clean the glass with alcohol. Let it dry. This is key for a strong bond.
Step-by-Step: Front Dash Cam Installation
Here is how to install dash cam on your front windshield. Take your time, and it will look like it came with the car.
-
Position and mark
- Sit in the driver’s seat. Hold the camera behind the mirror.
- Check the lens sees the road, not the headliner or hood.
- Make a small mark on the glass as a guide.
-
Mount the camera
- Warm the adhesive pad with your hands.
- Clean the area again. Peel and press the mount for 30 seconds.
- Slide the camera onto the mount.
-
Route the front cable
- Run the cable into the headliner with a trim tool.
- Go down the passenger A‑pillar edge. Do not cross the airbag seam.
- Tuck the wire into the door weather strip. Aim toward the glove box or footwell.
-
Choose your power method
- 12V socket: Plug into the center console or dash socket. Hide slack with clips.
- OBD adapter: Plug into the OBD port for easy install. Check ignition behavior.
- Hardwire: Use an add-a-circuit to a switched fuse. Ground to bare metal.
-
Power on and align
- Start the car. Check live view on the screen or app.
- Tilt so the horizon sits in the top third. Tighten the angle.
If you only need to know how to install dash cam with the 12V socket, you can stop here. The camera will start with the car and shut off after.
Pro tip: Leave a small service loop behind the mirror. This stops vibration and strain on the plug.
Optional: Hardwire for Parking Mode
If you want parking mode, here is how to install dash cam with a hardwire kit. This lets the cam watch while you are away, without killing the battery.
Steps:
-
Find fuses
- Use a multimeter to find a switched fuse (on with ignition) and a constant fuse (always on).
- Common choices are ACC, radio, or accessory fuses. Check the manual.
-
Install fuse taps
- Match the tap type to your fuse (mini, low-profile mini, or micro2).
- Place the original fuse in the lower slot and the cam fuse in the top slot.
- Respect fuse orientation so current flows the right way.
-
Ground the kit
- Use a factory ground bolt on bare metal.
- Sand paint if needed. Tighten well.
-
Set battery protection
- Use the kit’s cutoff at 12.0–12.2V for older batteries, 12.2–12.4V for newer.
- Test by leaving the cam on for an hour. Check the car still starts strong.
Safety note: Never run wires across airbag paths. Secure loose cable with zip ties. Avoid pinching wires under covers.
Add a Rear Camera
For full coverage, learn how to install dash cam rear modules with a clean cable route.
-
Plan the path
- Start at the front cam. Run the rear cable along the headliner on the passenger side.
- Go through the C‑pillar to the trunk or hatch.
-
Handle hatchbacks
- Use the factory rubber boot that carries the wiper wires.
- Feed the cable through with a small pull line. Be patient.
-
Mount rear unit
- Clean high center glass. Mount level and straight.
- Aim slightly down to reduce headlight glare at night.
-
Test and tidy
- Switch to rear view in the app. Check angle and focus.
- Use clips every 8–12 inches to stop buzz and wear.
Configure, Test, and Tidy Up
After you learn how to install dash cam, set it up right so it records what matters.
Do this now:
- Format the microSD card in the camera.
- Set resolution, bitrate, and loop length.
- Turn on GPS stamps, time sync, and G‑sensor.
- Enable voice or beep alerts so you know it is recording.
- Update firmware through the app when parked.
Road test:
- Drive 5–10 minutes. Hit a few bumps. Check for rattles.
- Review clips for focus, glare, and plate clarity.
- Adjust the angle by a few degrees if needed.
Legal, Privacy, and Data Tips
Part of how to install dash cam is knowing the law. Most places allow dash cams, but rules vary.
Keep it compliant:
- Do not block your view. Stay in the windshield’s dotted or shaded zone if you have one.
- In some states, audio recording needs consent. You can mute the mic.
- Store clips on encrypted cloud or locked phone if you drive for work.
- Replace high-endurance cards every 12–18 months. They wear out.
Maintenance and Troubleshooting
Ongoing care is the last step in how to install dash cam well. A few small habits keep it reliable.
Simple checks:
- Reformat the card monthly in the camera menu.
- Wipe the lens with a clean microfiber cloth.
- Check mounts in hot or cold weather.
Fix common issues:
- Camera won’t power: Test the socket, fuse tap, and ground. Try another cable.
- Glare or reflections: Add a CPL filter or place dark felt on shiny dash spots.
- File corruption: Replace the card with a high-endurance model and update firmware.
Safety, Mistakes to Avoid, and Pro Tips
What I learned after many installs and a few do-overs:
Avoid these:
- Crossing the A‑pillar airbag path with wire. Use the headliner edge instead.
- Mounting low on the glass. It blocks view and draws eyes.
- Cheap microSD cards. They fail when you need them.
Try these pro tips:
- Test the mount with painter’s tape first to find the best spot.
- Leave slack near hinge points and mirror stems to prevent strain.
- Label your fuse taps. Future you will thank present you.
- Keep a spare card in the glove box. Swap fast after an incident.
Frequently Asked Questions
Where is the best place to mount a dash cam?
High and centered behind the rearview mirror, outside your direct line of sight. This spot keeps the view clear and hides the device.
Do I need to hardwire my dash cam?
No. The 12V socket works for daily driving. Hardwiring is best if you want parking mode or a cleaner look.
Will a dash cam drain my battery?
A proper hardwire kit with low‑voltage cutoff protects your battery. Set a safe cutoff and use parking mode wisely.
What size microSD card should I use?
Use 128–256 GB high-endurance cards for daily use. These handle heat and constant writing better.
Can I install a rear camera in a hatchback?
Yes, route the cable through the factory rubber boot to the hatch. Take your time and use a pull line to avoid damage.
Is an OBD power adapter safe?
Yes for many cars, but check that it sleeps with the vehicle. If it stays live, switch to a fuse tap.
How often should I format the card?
Once a month is a good habit. It keeps files healthy and prevents write errors.
Conclusion
You now know how to install dash cam gear the right way: mount it high, route cables clean, choose smart power, and dial in your settings. The result is clear video, quiet operation, and confidence when it matters most. Take an hour this weekend, follow the steps, and make your car safer and your evidence solid.
Ready for more? Explore advanced parking mode settings, try a CPL filter, or add a rear unit. If this helped, subscribe for more hands-on car tech guides or drop your install questions in the comments.